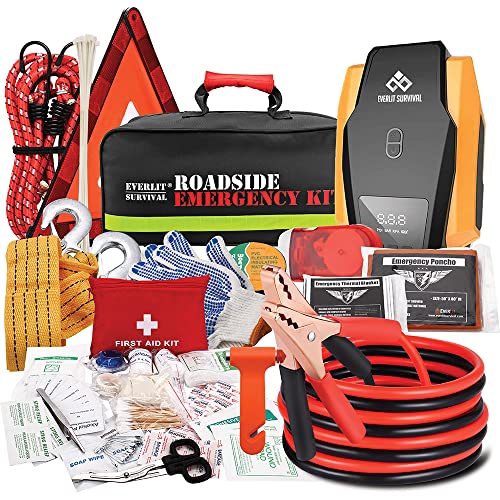
Building a car emergency kit on a budget is not only possible, it is smart. Our editorial team compared specifications, buyer feedback and key decision factors to help you assemble a practical, affordable kit. You do not need to buy a pre-made kit that costs a fortune. With a little planning and some smart shopping, you can create a reliable kit that covers the essentials without breaking the bank. This guide walks you through each step, from choosing the right container to prioritizing must-have items and finding cost-effective alternatives.
Why Build Your Own Kit
Pre-made emergency kits often include items you may never use, while missing others that are crucial for your region or driving habits. Building your own allows you to customize based on your needs, climate, and vehicle type. It also gives you control over quality and cost. Many pre-made kits are overpriced for what they contain. By sourcing items individually, you can save money and ensure every piece meets your standards. Plus, you learn exactly what is in your kit and how to use it, which is invaluable during an emergency.
Must-Have Items on a Budget
Focus on the basics that address common roadside scenarios: breakdowns, minor injuries, visibility, and basic survival. Here is a list of must-haves, along with budget-friendly suggestions.
- First aid kit: You can assemble your own with adhesive bandages, antiseptic wipes, gauze, medical tape, and pain relievers. These items are inexpensive when bought in bulk.
- Flashlight: A basic LED flashlight or a headlamp is essential. Look for one that uses AA batteries, which are easy to find. Consider a hand-crank model to avoid battery dependency.
- Multi-tool or basic toolkit: A simple multi-tool with pliers, screwdrivers, and a knife can handle many minor repairs. Alternatively, a small socket set and adjustable wrench are affordable at discount stores.
- Jumper cables: Choose a set with at least 10-gauge wire and insulated clamps. You can find reliable options for under $20.
- Reflective warning triangle or flares: These alert other drivers and prevent accidents. Reflective triangles are reusable and cost a few dollars each.
- Tire pressure gauge and portable air compressor: A gauge helps you check tire health, and a 12V compressor can be a lifesaver for slow leaks. Both are available at low prices.
- Blanket: A compact emergency blanket or a cheap fleece blanket provides warmth if you are stranded in cold weather.
- Water and non-perishable snacks: Store a few bottles of water and energy bars. Rotate them every few months to keep them fresh.
- Phone charger and power bank: A car charger and a small power bank ensure your phone stays charged for calls and navigation.
Affordable Alternatives and Savings
You can save money without compromising safety by using alternatives and smart shopping strategies.
- Repurpose household items: Use an old backpack or a sturdy tote bag as your container. A plastic storage bin with a lid works too, but a bag is easier to carry.
- Buy generic or store brands: For first aid supplies, bandages and antiseptics from discount stores are just as effective as name brands.
- Shop sales and clearance: Look for end-of-season discounts on blankets, flashlights, and tools. Dollar stores often have basic supplies at low prices.
- DIY solutions: Instead of buying a commercial reflective triangle, you can use a bright orange safety vest or a reflective tape on a piece of cardboard. However, proper triangles are safer and still cheap.
- Use a hand-crank flashlight: This eliminates the need for batteries, saving money in the long run.
- Check thrift stores: You can find gently used tools and blankets at thrift stores for a fraction of the cost.
- Prioritize multi-purpose items: A multi-tool replaces several single tools. A phone charger with a built-in battery pack serves two purposes.
Step-by-Step Assembly Guide
Follow these steps to build your kit efficiently and within budget.
- Choose a container: Select a durable bag or bin that is easy to grab. A backpack with multiple compartments keeps items organized.
- Gather first aid supplies: Assemble bandages, gauze, antiseptic wipes, medical tape, scissors, and pain relievers. Place them in a small pouch.
- Add tools: Include a multi-tool, screwdrivers, pliers, and an adjustable wrench. Wrap them in a cloth to prevent rattling.
- Include visibility items: Pack a reflective triangle, a bright vest, and a flashlight with extra batteries.
- Add vehicle-specific items: Include jumper cables, a tire pressure gauge, and a portable air compressor. If you have a spare tire, make sure you have the tools to change it.
- Prepare for comfort: Add a blanket, a change of clothes, and a pair of work gloves. In winter, include a hat and hand warmers.
- Store food and water: Place a few water bottles and energy bars in a zip-lock bag. Rotate them every few months.
- Include communication tools: Add a phone charger, a power bank, and a list of emergency contacts. A paper map is also useful if GPS fails.
- Organize and label: Use small pouches or bags to separate categories. Label each section with a permanent marker.
- Test and adjust: Check that all items fit and are accessible. Practice using the tools so you are familiar with them.
Maintenance and FAQ
Once your kit is assembled, regular maintenance ensures it is ready when needed. Check the kit every three months. Replace expired medications, refresh water and snacks, and recharge batteries. Adjust for seasonal changes, such as adding a heavier blanket in winter or extra water in summer. Also, inspect tools for rust or damage and replace any worn items.
Now, let's address some common questions about building and maintaining a budget car emergency kit.
What is the most important item in a car emergency kit?
A first aid kit is critical, but a flashlight and a basic tool kit are also essential. Prioritize items that help you signal for help, stay visible, and address minor injuries.
How often should I update my car emergency kit?
Check your kit every three months. Replace expired items, refresh batteries, and adjust for seasonal needs like extra blankets in winter or water in summer.
Can I use a backpack instead of a dedicated case?
Yes, a sturdy backpack is a cost-effective and flexible option. It keeps items organized and is easy to carry if you need to leave your vehicle.
Building a car emergency kit on a budget is a practical project that can save you money and provide peace of mind. By focusing on essential items and using affordable alternatives, you can create a kit that is both effective and economical. Remember to check the current price on Amazon for any items you prefer to buy new, and always prioritize safety over cost when making decisions.
